Using Resistance Bands for Lower Back Strengthening
Outline
Resistance bands enhance lower back muscle activation through variable resistance.
They promote flexibility and mobility crucial for lower back health.
Resistance bands are portable and convenient for home workouts.
Cost-effective compared to traditional weights, suitable for budgets.
Safe for rehabilitation, minimizing injury risk during recovery.
Versatile exercises target multiple muscle groups, improving overall stability.
Building core stability with bands reduces lower back pain risks.
Seated rows and pelvic thrusts are effective resistance band exercises.
Incorporate exercises three times weekly for best results.
Use resistance bands safely; inspect for wear before workouts.
Track progress for continual improvement in lower back strength.
Common mistakes include improper form and rushing movements.
Resistance bands improve strength and endurance, aiding overall performance.
Bird-Dog exercise enhances core and lower back stability.
Bridges with bands strengthen glutes while stabilizing the lower back.
Benefits of Using Resistance Bands for Lower Back Strengthening
Enhanced Muscle Activation
Resistance bands are particularly effective at enhancing muscle activation in the lower back due to their ability to provide variable resistance. When performing exercises such as seated rows or deadlifts with bands, the tension increases as the bands stretch. This creates a progressive overload on muscles, which can lead to greater strength development over time.
Research has shown that the use of elastic bands in training regimens can improve neuromuscular function. A study published in the Journal of Strength and Conditioning Research highlights that Resistance Bands can activate muscle fibers more efficiently than free weights in certain exercises. This can translate to better overall muscle strength and stability, especially in the lower back region.
Improved Flexibility and Mobility
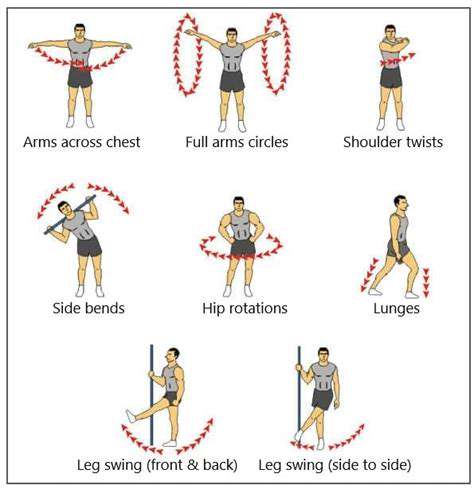
Incorporating resistance bands into your routine also promotes flexibility and mobility, key components of an effective Lower back strengthening program. Stretching with bands during warm-ups or cool-downs can enhance range of motion, allowing for better performance during resistance training. Having greater flexibility in the hips and hamstrings can prevent strain on the lower back as well.
Additionally, bands can assist in dynamically stretching muscle groups, which is valuable for warm-ups. A study published in the American Journal of Sports Medicine pointed out how dynamic stretching improves overall athletic performance and reduces injury risk. Bands allow for safe stretching that can effectively prepare the lower back for more intense activities.
Portability and Convenience
One of the most appealing aspects of resistance bands is their portability. Unlike traditional weights, bands are lightweight and can easily be stored or transported. This is particularly beneficial for individuals who prefer to exercise at home or while traveling. You can easily incorporate them into a home gym or take them along on trips, ensuring that you can maintain a consistent workout schedule.
Cost-Effectiveness
When it comes to fitness investments, resistance bands are a cost-effective option compared to machines or free weights. They provide a diverse range of exercises at a fraction of the cost. For someone focused on strengthening the lower back, purchasing a set of resistance bands can yield significant results without breaking the bank.
Moreover, many bands come in sets with varying resistances. This means you can progressively increase the difficulty of your workouts without constantly needing to invest in heavier weights or new equipment. This accessibility makes resistance bands a smart choice for budget-conscious fitness enthusiasts.
Safe for Rehabilitation
For those recovering from lower back injuries, resistance bands offer a safe alternative to traditional weightlifting. The controlled resistance allows for gradual strength-building without placing excessive strain on vulnerable areas. Physical therapists often recommend bands for patients with lower back issues because they can help maintain strength while minimizing injury risk.
Versatile Exercise Options
The versatility of resistance bands allows for a wide array of exercises targeting not just the lower back, but other muscle groups as well. This multifunctionality helps create balanced strength throughout the body, which is essential for overall stability and support. Exercises such as banded squats and woodchoppers will engage multiple muscle groups while specifically targeting the lumbar region.
By varying the types of exercises and bands, individuals can tailor their workouts to their specific needs. This adaptability means that whether you’re a beginner or an experienced athlete, there are effective options for improving lower back strength. A comprehensive program could include a mix of core stability, endurance, and strength exercises.
Building Core Stability
Resistance bands are excellent for enhancing core stability, which is crucial for a healthy lower back. Strong core muscles support the spine and can reduce the incidence of lower back pain. Exercises such as banded planks or Russian twists can effectively target core engagements while also working the lower back.
Research indicates that core stability is instrumental in preventing lower back injuries. A study in the European Spine Journal suggests that strengthening the core and lower back through dedicated resistance training can significantly reduce the risk of injury. By incorporating resistance bands, individuals can work towards achieving optimal core strength and stability.
Key Resistance Band Exercises for the Lower Back
Understanding the Basics of Resistance Band Use
Resistance bands are versatile tools for strengthening muscles and improving flexibility. They come in various resistance levels, which allows users to select bands that meet their current fitness capabilities. If you’re new to resistance training, it is advisable to start with lighter bands to master the form before progressing to heavier bands. Proper technique is crucial to avoid injuries and maximize effectiveness.
Research conducted by the American Council on Exercise (ACE) shows that resistance bands can be as effective as free weights for building muscle strength. This makes them especially suitable for individuals who may not have access to a full gym setup. Additionally, resistance bands are lightweight and portable, making them perfect for workouts at home or while traveling.
Benefits of Resistance Band Exercises for Lower Back
Incorporating resistance band exercises into your routine can significantly enhance lower back strength, which is vital for overall stability and mobility. Strong lower back muscles support better posture, reducing the risk of strain and injury during everyday activities. An added benefit is that resistance bands promote muscle endurance, as they provide continuous tension through the full range of motion.
Furthermore, resistance bands enable a greater range of motion compared to traditional lifting methods. This is crucial for lower back health as it trains the muscles to maintain stability under various conditions. Moreover, exercises using resistance bands can be tailored to suit rehabilitation protocols, making them suitable for individuals recovering from back injuries.
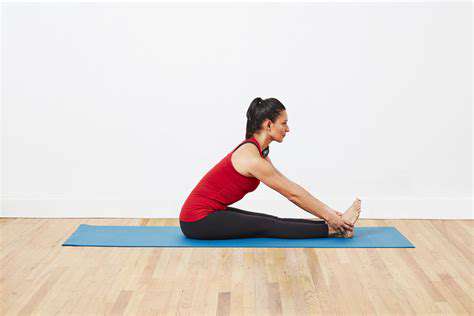
Essential Resistance Band Exercises for the Lower Back
Key exercises include the seated row, pelvic thrusts, and bent-over rows. The seated row effectively targets the rhomboid and lower back muscles while promoting proper posture. To perform this, sit on the floor, loop the band around your feet, and pull the band towards your torso. Additionally, pelvic thrusts can strengthen the glutes, which supports the lower back. Lying on your back, place the band around your hips and press upward against the resistance.
Using resistance bands not only builds strength but also enhances coordination. The bent-over row, where you bend at the hips while holding the band, yields great results by working the back muscles while also activating the core. Consistent practice can significantly improve muscle tone and endurance in the lower back, leading to better overall physical performance.
How to Incorporate Resistance Band Workouts into Your Routine
To effectively enhance your lower back strength, aim to incorporate resistance band exercises three times a week. A balanced routine should include both strengthening and stretching exercises to prevent stiffness and improve flexibility. You might consider a 20-30 minute workout structured around key movements such as the seated row, deadlifts, and shoulder presses.
Moreover, don’t hesitate to mix in bodyweight exercises like planks or side planks to complement your routine. This blend ensures you are not only strengthening but also stabilizing your core, which is integral for lower back health. Always focus on proper form to ensure the effectiveness of your workouts and reduce the potential for injury.
Real-Life Applications of Resistance Band Training
Many athletes use resistance bands to improve their performance in their respective sports by enhancing strength and preventing injuries. For example, runners might incorporate band exercises to strengthen their core and lower back, which in turn supports better posture and endurance on long runs. Physical therapists often recommend resistance bands for patients undergoing rehabilitation due to their safety and effectiveness.
A study published in the Journal of Sports Rehabilitation found that resistance training with bands not only improved muscle strength but also enhanced functional abilities in patients recovering from lower back pain. This evidence supports the idea that resistance bands can be beneficial across various demographics, including seniors and those with chronic pain issues.
Safety Considerations When Using Resistance Bands
While resistance bands are generally safe, it is vital to follow certain precautions to avoid injuries. Always inspect your bands for signs of wear and tear before use, as a broken band can lead to sudden injuries. Also, ensure that your anchoring points are secure during exercises to prevent slippage, which could put you at risk.
Furthermore, start slow, allowing your body time to adapt to the new resistance. Gradually increase resistance levels only when you are comfortable with your form and strength. Listening to your body is crucial; if something doesn’t feel right, it’s best to stop and reassess your technique before you continue.
1. Seated Row
Understanding the Mechanics of the Seated Row
The Seated Row Exercise specifically targets the muscles of the upper and lower back, notably the latissimus dorsi and rhomboids. By utilizing resistance bands, individuals can adjust the intensity of their workout based on their strength levels. The mechanics of this exercise involve pulling the band from a seated position, allowing for both stability and focused engagement of the back muscles. Research indicates that variations of this exercise can enhance muscle activation significantly, offering a balanced workout.
Moreover, the seated row is beneficial for improving posture by strengthening the muscles that support the spine. Poor posture is often a result of weak back muscles, which can lead to discomfort and chronic pain. By incorporating this exercise into a regular fitness routine, practitioners may experience better structural alignment over time. Consistent training can lead to enhanced performance in other physical activities, as a strong back provides a solid foundation.
How to Perform the Seated Row with Resistance Bands
Performing a seated row with resistance bands requires attention to form and technique to maximize effectiveness. Begin by sitting on a sturdy surface, legs extended in front of you, and anchor the band around your feet. Grasp the handles or ends of the band, ensuring your grip is firm yet comfortable. Pull the band towards your torso while keeping your elbows close to your body, and focus on contracting your back muscles. Always maintain a straight back and avoid overarching your spine.
For best results, consider performing 2-3 sets of 10-15 repetitions. As your strength improves, gradually increase the resistance level by using thicker bands or adjusting band position. It’s crucial to maintain controlled movements throughout the exercise; avoid using momentum for better muscle engagement. The seated row is not only effective for strength gain but also for muscle endurance, offering longevity in physical fitness.
Don’t forget to pair this exercise with a proper warm-up; dynamic stretches for the back and shoulders can prepare your body and reduce injury risk. It’s also advisable to cool down post-workout with stretches that lengthen the back muscles to facilitate recovery.
Common Mistakes to Avoid During the Seated Row
When performing seated rows with resistance bands, individuals often make several common mistakes that can diminish effectiveness or increase the risk of injury. One prevalent error is rounding the shoulders during the pull, which tends to engage the neck muscles rather than the back. To mitigate this, focusing on engaging the scapula and keeping the shoulders down and back during the movement can enhance the exercise’s efficacy.
Another mistake involves insufficient resistance or overcommitting at high resistance levels. Beginners should ensure that they start at a resistance that is challenging yet manageable, allowing them to maintain proper form throughout the sets. Additionally, failing to keep a stable core can lead to undue stress on the lower back; thus, maintaining core engagement during the entire movement is paramount. Ensuring awareness of these mistakes allows for safer workouts and promotes more effective strengthening of the lower back.
Integrating Seated Rows into Your Fitness Routine
To foster consistent Strength Development in the lower back, integrating seated rows into a comprehensive fitness routine is key. This exercise should ideally be part of a balanced program that includes both strength training and flexibility work. For instance, combining seated rows with core strengthening exercises, like planks or bridges, can provide comprehensive support to the lower back, promoting overall stability.
Furthermore, consider engaging in mobility work, such as yoga or dynamic stretches, to enhance flexibility that complements strength training. This balanced approach can also help in preventing injuries associated with tight and overused muscles. Setting realistic goals and tracking progress can motivate consistency in execution. As with any exercise, it’s beneficial to consult with a fitness professional to customize routines based on personal fitness levels and objectives.
Finally, self-evaluation after a few weeks of diligent training can offer insights into your progress, helping you to identify areas for growth. Whether it’s refining technique or increasing resistance, adapting your approach will ensure continuous improvement in lower back strength over time.
2. Standing Back Extension

Understanding the Fundamentals of the Standing Back Extension
The Standing Back Extension is a crucial exercise for strengthening the lower back, often overlooked in traditional workouts. It primarily targets the muscles in the lumbar region, enhancing stability and posture. Integrating this exercise into your routine can significantly improve functional movement and reduce the risk of injury. A better understanding of this exercise begins with appreciating the mechanics involved.
When performed correctly, the standing back extension engages core stabilizers that support the spine. This engagement not only fortifies the lower back but also activates the glutes and hamstrings, contributing to overall body strength. It is essential to master the basic form to reap these benefits and ensure safety while exercising.
Step-by-Step Guide to Performing Standing Back Extensions
- Begin by positioning your feet shoulder-width apart.
- Engage your core and keep your back straight.
- Slightly bend your knees and hinge forward at the hips.
- Extend your spine as you return to the upright position.
To execute the standing back extension, stand upright with your feet hip-width apart. With resistance bands secured around your upper body, Engage Your Core and initiate the movement by hinging at the hips. This controlled motion ensures that only your upper body moves while your back remains straight. Proper form is vital—without it, you risk strain, which can lead to injury.
Incorporating Resistance Bands for Enhanced Effectiveness
Resistance bands add an impressive layer of challenge to the standing back extension. They allow for adjustable resistance, enabling users to tailor the workout to their fitness levels. When selecting bands, consider their thickness and resistance level; thicker bands provide more resistance, ideal for advanced strength training.
Using bands improves muscle engagement throughout the extension, promoting better strength development. The added resistance forces your muscles to work harder, especially when maintaining stability and control throughout the motion. This not only enhances physical outcomes but also increases metabolic activity, making it a more effective workout.
Common Mistakes to Avoid
Many individuals struggle with maintaining proper form during back extensions. A common mistake includes arching the back too much; this can compromise spinal health and increase the risk of injuries. Another error is extending too quickly, leading to loss of control and improper muscle engagement, which can impact effectiveness.
To maximize the benefits, focus on slow, controlled movements. This helps in isolating the muscle groups effectively. It might be beneficial to start without bands until you’re confident in your form, and gradually incorporate them as your strength improves. Always prioritize safety over intensity.
Tracking Progress and Setting Goals
Monitoring your progress in resistance training is crucial for sustained improvement. Keep a log of your workouts, noting the resistance level, number of repetitions, and sets completed. This data provides insight into your performance trends and helps in setting achievable goals.
As you become comfortable with the standing back extension, consider gradually increasing the resistance or number of repetitions. Setting specific milestones can motivate you to stick to your training routine and can also enhance your long-term commitment to lower back health and strength.
3. Side Bend
Benefits of Side Bend Exercises
The side bend exercise is highly effective for targeting the oblique muscles, which play a critical role in stabilizing the spine. Strengthening these muscles not only supports better posture but also helps in preventing injuries, especially for individuals who have sedentary lifestyles. Research indicates that engaging these muscles through resistance band exercises can significantly reduce lower back pain, as reported by a study in the Journal of Orthopaedic & Sports Physical Therapy.
Furthermore, incorporating side bends into your routine enhances flexibility within the lateral regions of your torso, which often become stiff due to lack of movement. This increase in flexibility can improve overall performance in various physical activities, from running to weightlifting. A well-rounded strength training routine that includes side bends can lead to substantial gains in mobility and functionality.
How to Perform Side Bends with Resistance Bands
To effectively perform side bends with resistance bands, start by anchoring the band at a stable point at waist level. Stand perpendicular to the band, holding the other end with the hand farthest from the anchor. Keeping your feet shoulder-width apart, engage your core and slowly bend to the side, allowing the band’s resistance to create tension. It's crucial to maintain a controlled motion and avoid jerking or twisting, which can lead to strain. Aim for 10 to 15 repetitions on each side to feel the full benefit.
As you progress, you can increase the resistance of the band or add more repetitions to enhance the challenge. Form is paramount during this exercise; ensure that your back remains straight throughout the motion to maximize effectiveness and minimize injury risk. Paired with a structured routine, side bends can be a fun yet powerful addition to anyone's lower back strengthening regimen.
4. Bridges with Resistance Band

Understanding the Bridge Exercise
The bridge exercise is a crucial movement that targets the glutes, hamstrings, and lower back. Proper execution enhances core stability and minimizes the risk of injury during lower back strengthening exercises. This exercise has also been identified as beneficial for improving pelvic stability, essential for daily activities.
When performed correctly, bridges can help with posture and alleviate strain on the lower back. It's vital to understand the core mechanics involved, as maintaining proper form allows for maximum engagement of targeted muscles without overloading other areas.
Incorporating Resistance Bands
Resistance bands serve as an excellent tool to increase the intensity of bridge exercises. By adding a band around the thighs, you introduce a lateral resistance that amplifies muscle engagement, specifically in the glutes. This added challenge not only improves strength but also enhances stabilization of the hips, making it a more effective workout.
The bands come in various resistance levels, allowing for tailored workouts suitable for any fitness level. Beginners might start with lighter bands, gradually progressing to heavier ones as their strength improves.
Step-by-Step Instructions for Resistance Band Bridges
- Begin by lying on your back with your knees bent and feet flat on the floor.
- Place the resistance band just above your knees.
- Engage your core and press your feet into the floor as you lift your hips toward the ceiling.
- Hold the bridge position for a few seconds while squeezing your glutes, then lower down.
- Repeat for the desired number of repetitions, maintaining tension in the band throughout.
Following these steps will ensure the most effective use of the resistance bands in your bridge exercises. Keep your body aligned and avoid letting your knees cave in as you press upwards; this ensures you’re not only strengthening your muscles effectively but also protecting your joints.
Common Mistakes to Avoid
While performing resistance band bridges, one of the common mistakes involves improper alignment. Ensure your feet remain hip-width apart and your knees follow the same line; this alignment is crucial for avoiding strain and ensuring that you are targeting the right muscles.
Another frequent error is rushing through the movement. Performing the exercise too quickly can lead to a lack of muscle engagement and reduce its effectiveness. Be mindful of your pace, and remember to concentrate on the contraction and relaxation of the muscles involved.
Benefits of Resistance Band Bridges for Lower Back Strengthening
Resistance band bridges specifically offer multifaceted benefits for those looking to strengthen their lower back. Firstly, they are low-impact, making them suitable for individuals with previous back injuries. This exercises focuses on stabilization and endurance, keys to maintaining a healthy back.
The incorporation of resistance bands allows for a gradual increase in strength. Studies have shown that controlled strength training contributes to better overall spine health and functionality. By consistently challenging the muscles, resistance band bridges can effectively enhance both strength and flexibility in the lower back region.
Final Thoughts on Resistance Band Bridges
Incorporating resistance band bridges into your routine can lead to significant improvements in lower back strength. Remember, consistency is key; aim to perform them regularly for optimal results. Additionally, don't hesitate to modify the exercise as necessary to match your fitness level.
Lastly, as with any exercise, it's crucial to listen to your body. If you experience any discomfort or pain while performing resistance band bridges, consider consulting with a fitness professional or physical therapist to ensure you're using the right technique and addressing any underlying issues.
5. Bird-Dog Exercise
Understanding the Bird-Dog Exercise
The Bird-Dog exercise is a highly effective movement that targets both the core and lower back, making it exceptionally beneficial for individuals aiming to enhance their overall stability. Research has shown that exercises focusing on the core, such as the Bird-Dog, can significantly improve balance and coordination, especially in those engaged in regular sports or physical activities.
This exercise gains its name from the natural posture that resembles a dog extending its leg and arm while standing. By promoting stability through alternating the arm and leg movements, the Bird-Dog not only strengthens the back but also fosters a connection between the upper and lower body, which is crucial for functional movements in daily life.
How to Perform the Bird-Dog Exercise Correctly
To execute the Bird-Dog exercise, begin by positioning yourself on all fours, ensuring your wrists are directly under your shoulders and your knees under your hips. Keep your back flat, engaging your core muscles to maintain a neutral spine throughout the movement. This foundational position is crucial, as improper alignment can lead to ineffective training and potential injury.
Next, extend your right arm forward while simultaneously extending your left leg back, forming a straight line from your fingertips to your toes. It's essential to maintain balance and control during this action. Hold the position for a few seconds, focusing on maintaining stability. Return to the starting position and repeat with the opposite arm and leg. Performing 10 to 15 repetitions on each side is recommended for enhanced results.
Benefits of Incorporating Resistance Bands
Integrating resistance bands into the Bird-Dog exercise amplifies its benefits by adding an external load that challenges your muscles more effectively. Resistance bands create continuous tension throughout the movement, which can lead to increased strength and stability in the lower back and core areas. This added resistance is particularly useful for patients undergoing rehabilitation, as it allows for a customizable intensity based on individual strength levels.
Moreover, research published in the Journal of Sports Science and Medicine highlights that exercises with resistance bands facilitate hypertrophy and strength gains similarly to traditional weight training, but with a reduced risk of injury. For beginners, using a light band can help in mastering the movement before moving on to heavier levels as strength improves.
Common Mistakes to Avoid
Many individuals, especially beginners, may make several common mistakes when performing the Bird-Dog exercise. One prevalent error is allowing the lower back to sag or arch significantly, which compromises the intended benefits and can lead to discomfort or pain. It’s essential to keep the pelvis stable and engaged to avoid these pitfalls.
Another mistake involves rushing through the exercise. Performing the movement slowly and with control ensures greater muscle engagement and provides an opportunity to focus on proper alignment. A suggestion is to start with fewer repetitions while concentrating on form to lay a strong foundation.
Integrating Bird-Dog into Your Routine
Incorporating the Bird-Dog exercise into your regular workout routine can yield significant improvements in lower back strength and overall physical performance. Consider including it as part of your warm-up or cool-down sessions to enhance flexibility and prepare the muscles for more intense activities. This strategic placement can also aid in injury prevention, especially for individuals engaged in sports that place stress on the lower back.
As you progress, feel free to combine the Bird-Dog with other exercises targeting different muscle groups to create a comprehensive workout. For instance, pairing it with planks or glute bridges can provide a well-rounded approach to strengthening the core and back region. Be sure to listen to your body and adjust the frequency and intensity as needed to suit your personal fitness level.
Integrating Resistance Bands into Your Routine

Understanding the Benefits of Resistance Bands
The use of resistance bands for strengthening the lower back has gained popularity among fitness enthusiasts and physical therapy practitioners alike. Research shows that resistance bands can effectively target the deep muscles in the lower back, an area often overlooked in traditional strength training programs. This targeted approach is crucial for enhancing overall stability and mobility.
Additionally, using resistance bands offers a versatile and portable solution for individuals who may not have access to bulky gym equipment. Organizations like the American Council on Exercise (ACE) emphasize that resistance bands provide a safe and effective means of rehabilitation for individuals recovering from lower back injuries.
Selecting the Right Resistance Band
When incorporating resistance bands into your lower back strengthening routine, choosing the appropriate band is essential. Bands come in various resistance levels, typically color-coded for convenience. Starting with a lighter band is advisable, especially for beginners, as it allows individuals to focus on form and technique without risking injury.
As strength improves, one can gradually transition to bands with higher resistance. It’s important to listen to your body and avoid pushing beyond your limits. Many fitness experts recommend investing in a set of bands to provide varied resistance options tailored to your progress.
Effective Exercises for Lower Back Strengthening
- Seated rows
- Deadlifts
- Hip thrusts
- Woodchops
Implementing specific exercises with resistance bands can significantly enhance lower back strength. For example, seated rows engage the entire back and reinforce the connection between the upper and lower body. Deadlifts using bands encourage proper form and minimize the risk of injury compared to traditional weights.
According to a study published in the Journal of Physical Therapy Science, exercises like hip thrusts and woodchops activate both the glutes and core, providing additional support for the lower back. Incorporating these exercises into your routine can yield comprehensive muscle development...
Creating a Balanced Routine
Creating a balanced workout routine with resistance bands involves not just strength training but also flexibility and stability work. Incorporate stretching and mobility exercises that target the hip flexors and hamstrings to mitigate potential tension in the lower back. Flexibility is just as important as strength training when it comes to preventing injuries.
A well-rounded routine should include exercises that promote stability in the core, such as planks and bridges. This not only benefits the lower back but enhances overall athletic performance. Consider working with a fitness professional to develop a personalized program that emphasizes balance throughout the body.
Incorporating Bands into Your Daily Life
Resistance bands can be easily integrated into daily life, enabling consistent lower back strength training without a structured gym session. For instance, you might use bands while watching television or during breaks at work. This approach makes it easier to create a habit without feeling overwhelmed.
Consider setting small, achievable goals like performing three sets of band exercises each day. This method fosters a sense of accomplishment over time, contributing to a stronger lower back and overall fitness. It’s all about finding practical ways to make your routine seamless and manageable.
Monitoring Progress and Adjusting Your Routine
Regularly monitoring your progress is crucial to ensure you're strengthening your lower back effectively. Keep a workout journal detailing exercises performed, resistance levels used, and personal notes on how you feel. This method not only tracks improvement but also highlights exercises you find particularly beneficial or challenging.
Adjusting your routine based on this feedback is equally important. If an exercise begins to feel too easy, it’s a signal to either increase the resistance or change the movement to ensure you continue to challenge your muscles. Exploring variations and seeking new exercise recommendations can keep your routine fresh and engaging.
Read more about Using Resistance Bands for Lower Back Strengthening


Hot Recommendations
-
*Guide to Understanding Processed Foods and Their Risks
-
*Best Habits for Environmental Health
-
*How to Build a Consistent Morning Routine
-
*Running Tips for Your First Marathon Training
-
*How to Build a Habit of Learning Something New Daily
-
*Best Exercises for Cyclists to Build Strength
-
*How to Use Resistance Bands for a Full Body Workout
-
*Guide to Practicing Forgiveness
-
*Guide to Setting Realistic Health Goals
-
*Understanding Kidney Disease: Symptoms and Management