15 Low Calorie Dinner Recipes That Actually Taste Good
2. Marinating the Chicken
To enhance the flavor, marinate the chicken for at least two hours or overnight in the refrigerator. Combine the lemon juice, olive oil, minced garlic, and chopped herbs in a bowl, and mix well. This not only tenderizes the meat but also ensures that the flavors penetrate deeply. Some studies suggest that marinating chicken can reduce the formation of harmful compounds generated during grilling.
When ready, place the chicken breasts in a resealable plastic bag or a shallow dish, and pour the marinade over them. Seal the bag or cover the dish tightly and refrigerate. This step transforms an ordinary meal into something aromatic and uniquely delicious.
3. Preparing the Grill
While the chicken marinates, prepare your grill. Preheating is essential for achieving that delicious charred flavor. Aim for a medium-high heat setting and ensure the grates are cleaned properly; this not only prevents the chicken from sticking but also eliminates any residual flavors from previous cookouts.
To enhance the grilling experience, brush the grill grates with a light coating of oil prior to placing the chicken. This step is vital in ensuring even cooking and easy flipping, preventing any potential frustration when trying to turn the meat. A clean grill welcomes a succulent chicken that won’t fall apart upon handling.
4. Grilling Techniques
Grilling the chicken correctly is crucial for achieving the desired texture and flavor. Place the marinated chicken breasts on the grill and cook for about six to seven minutes per side. Avoid flipping them too soon; allowing a good sear will create those attractive grill marks and enhance flavor.
Use a meat thermometer to check if the chicken has reached a safe internal temperature of 165°F (75°C). Investing in a quality thermometer takes the guesswork out of grilling and ensures that your meal is both safe and delicious. Once done, let the chicken rest for a couple of minutes before slicing.
5. Serving Suggestions
Once the Grilled Lemon Herb Chicken has rested, it’s time to serve! Slice the chicken into strips and arrange on a platter. Pair it with a fresh garden salad, a side of steamed vegetables, or even quinoa for a healthy boost. These options not only complement the flavors but also keep the meal low-calorie.
For added zest, consider drizzling a bit of the reserved marinade over the top. Just make sure to cook it beforehand to eliminate any risks from raw chicken. You might also want to sprinkle some additional fresh herbs on top for a beautiful, inviting presentation.
6. Storage and Reheating
If you have leftovers, store them in an airtight container in the refrigerator. Grilled Lemon Herb Chicken can last for up to four days when stored properly. For best results, consume it sooner than later to enjoy the best flavors and moisture.
When reheating, use a microwave or an oven, ideally wrapped in aluminum foil to retain moisture. Reheating on a skillet with a splash of olive oil can also restore some of that original grilled texture, making the chicken just as appealing the next day.
7. Nutritional Benefits
Not only does Grilled Lemon Herb Chicken appeal to the taste buds, but it also offers numerous Nutritional benefits. A serving size provides approximately 200 calories, depending on how much marinade is used. The dish is rich in protein – an essential nutrient for muscle repair and growth, particularly important if you lead an active lifestyle.
Additionally, the incorporation of Fresh herbs and lemon adds valuable vitamins and antioxidants. Lemons are particularly high in vitamin C, which supports the immune system, while herbs like rosemary have been linked to improved digestion and even cognitive function. Making this dish a staple in your meal rotation supports both flavorful experiences and healthier eating habits.
2. Quinoa and Black Bean Salad
Ingredients Needed
Preparing a delicious Quinoa and black bean salad begins with selecting fresh, high-quality ingredients. Start with one cup of quinoa, which is packed with protein and fiber, making it a perfect base for this dish. Alongside the quinoa, you'll need one can of black beans; they should be drained and rinsed to reduce sodium content and enhance the flavor.
In addition to the main ingredients, incorporate ripe cherry tomatoes for a burst of sweetness and chopped red onion for a zesty crunch. Fresh cilantro adds an aromatic touch, while lime juice elevates the overall flavor profile. Don’t forget a pinch of cumin and salt for seasoning that brings all the elements together beautifully.
Preparation Steps
Begin by rinsing the quinoa under cold water to remove its natural coating, called saponin, which can give a bitter taste if not washed off properly. Cook the quinoa in two cups of water or vegetable broth, bringing it to a boil and then simmering it for about 15 minutes. Once cooked, fluff it with a fork and let it cool.
While the quinoa cooks, chop the vegetables and herbs. Dicing the tomatoes, onion, and cilantro finely will ensure that every bite has a bit of everything. Combine the cooled quinoa and prepared vegetables in a large mixing bowl, tossing gently to combine.
Nutritional Benefits
This quinoa and black bean salad is not only satisfying but also incredibly nutritious. Quinoa is a complete protein, meaning it contains all nine essential amino acids. Moreover, both quinoa and black beans are excellent sources of fiber, which is important for digestive health. A single serving can provide substantial amounts of iron, magnesium, and B vitamins that are necessary for optimal body function.
Furthermore, the inclusion of tomatoes and cilantro adds vitamins C and K, and their antioxidants support heart health. This combination of ingredients makes the salad not only a low-calorie meal but also a powerhouse of essential nutrients.
Best Serving Suggestions
Enjoy this salad as a stand-alone dish, especially on warm days when you crave something light and refreshing. Pair it with a side of grilled chicken or fish for added protein if desired. Alternatively, use it as a filling for lettuce wraps, offering a unique twist on traditional salads.
This salad can also be prepped in advance. Simply store it in an airtight container in the refrigerator for up to three days. The flavors will meld and deepen over time, making it an ideal candidate for meal prepping.
Variations to Try
One of the great aspects of quinoa and black bean salad is its versatility. You can easily add other ingredients to customize the flavor to your liking. For some heat, consider adding jalapeño or diced bell peppers. Avocado can also be a fantastic addition, providing healthy fats that enhance the creamy texture of the dish.
Experiment with different herbs as well; for example, using mint in place of cilantro can offer a refreshing change. Additionally, for a Mediterranean twist, include feta cheese and olives. These alternatives can transform your salad into a completely different culinary experience.
Storage Tips
To maintain freshness, store the salad in a sealed container in the refrigerator. If preparing in bulk, it's best to keep the dressing separate until you're ready to serve to prevent sogginess. You can whisk together olive oil, lime juice, salt, and pepper for a simple dressing that complements the salad perfectly.
Final Thoughts
This quinoa and black bean salad not only aligns with a low-calorie diet but is also filling and satisfying, making it a standout dish for dinner. The flavors are vibrant, and the dish is easy to prepare, making it ideal for both busy weeknights and leisurely weekends. Plus, it caters to various dietary needs, whether vegan, vegetarian, or gluten-free.
Incorporating such dishes into your nightly routine can significantly impact your overall health without sacrificing taste. It's a step toward embracing a more nutritious lifestyle that keeps dinner enjoyable and innovative.
3. Spaghetti Squash with Marinara Sauce
Preparation of Spaghetti Squash
To start, you'll need a medium-sized spaghetti squash, which is nutrient-rich and a great low-calorie substitute for traditional pasta. Begin by preheating your oven to 400°F (200°C). While it’s heating, carefully slice the squash in half lengthwise. This can be a bit tricky, so use a sturdy knife and exercise caution.
Once halved, scoop out the seeds using a spoon and discard them. The flesh of the squash has a mild flavor but packs plenty of fibers and vitamins. For enhanced flavor, brush the insides lightly with olive oil and sprinkle a pinch of salt and pepper. This step prepares the squash for roasting, enhancing its taste significantly.
Cooking Techniques
Roasting is the most effective way to prepare spaghetti squash, as it allows the sugars to caramelize, giving the dish a sweeter depth. Place both halves cut-side down on a baking sheet lined with parchment paper to avoid sticking. Bake in the oven for about 30 to 40 minutes, or until the flesh is tender and easily shredded with a fork.
Alternatively, you can microwave the squash for a quicker option. Place one half (cut-side down) in a microwave-safe dish with a little water, covering it with plastic wrap. Cook on high for about 10 to 12 minutes, but keep an eye on doneness to ensure it doesn't become overcooked.
Making Marinara Sauce from Scratch
Creating a homemade marinara sauce can elevate your dish beyond store-bought alternatives. Start with a base of sautéed garlic in olive oil for about 2 minutes. Add diced tomatoes—preferably San Marzano for authentic flavor—and a splash of red wine for depth. Let this mixture simmer for about 20 minutes to develop the flavors.
Spice it up with a pinch of red pepper flakes and some freshly chopped basil just before serving. This combination ensures a fresh, vibrant sauce that complements the subtle flavor of the squash, and you can adjust seasoning based on your taste preferences.
Healthy Add-Ins to Enhance Nutrition
Consider enhancing your spaghetti squash with additional vegetables for added texture and nutrients. For instance, incorporating sautéed spinach or roasted bell peppers can provide essential vitamins like A and C, adding color and a medley of flavors to the dish.
Adding protein such as grilled chicken or turkey meatballs is a great way to create a well-rounded meal. Legumes like lentils or chickpeas can also be a fantastic option for plant-based diets, ensuring that the dish stays filling and nutritious.
Serving Suggestions
When plating, separate the strands of the spaghetti squash using a fork for a more authentic pasta appearance. Pour the homemade marinara sauce generously over the top, allowing the warmth of the sauce to slightly wilt any fresh herbs you might have added earlier.
For an added touch, consider garnishing the dish with grated Parmesan or nutritional yeast for a dairy-free alternative, which adds a savory finish to the dish. Serve it alongside a simple green salad to balance the meal.
Storing and Reheating Leftovers
If you end up with leftovers, spaghetti squash with marinara sauce can be stored in an airtight container in the refrigerator for up to four days. To reheat, a quick microwave for 1 to 2 minutes should suffice, or you can gently heat it on the stove over medium heat to preserve the texture.
For longer storage, consider freezing the cooked squash and sauce separately. This allows for easy meal prep in future weeks, ensuring that you always have a low-calorie, delicious option on hand.
Expert Tips for Perfect Results
One of the biggest pitfalls in cooking spaghetti squash is overcooking it, leading to a mushy texture. Always test for doneness by piercing the flesh with a fork; it should easily shred without being overly soft. If you're unfamiliar with cooking times, err on the side of caution with shorter cooking durations.
Finally, feel free to customize your marinara sauce further by incorporating different herbs such as thyme or oregano for a whole new profile. Cooking doesn't have to be rigid, and experimenting with flavors can yield delightful results, keeping your dinner interesting and enjoyable.
4. Salmon with Asparagus
1. Nutritional Benefits of Salmon
Salmon is often touted as a superfood due to its rich nutritional profile. A 3.5-ounce serving of salmon contains about 25 grams of protein, which is essential for muscle repair and growth. Additionally, it's an excellent source of omega-3 fatty acids, specifically EPA and DHA, which are beneficial for heart health, reducing inflammation, and even improving brain function.
Beyond omega-3s, salmon is also loaded with essential vitamins and minerals. For instance, it provides significant amounts of vitamin B12, which is crucial for nerve function, and selenium, a powerful antioxidant. Research indicates that incorporating fatty fish like salmon into your diet can lower the risk of chronic diseases, making it an essential inclusion for health-conscious individuals.
2. Choosing Fresh Asparagus
When preparing a dish like Salmon with Asparagus, selecting the freshest asparagus is crucial. Look for bright green stalks with tightly closed tips, as these indicators signal freshness. Avoid any asparagus that appears wilted or has overly soft stems. Fresh asparagus not only enhances the dish visually but also adds crispness and a vibrant flavor that complements the rich salmon.
Asparagus is also packed with nutrients. It provides a good source of fiber, which aids in digestion, and is rich in vitamins A, C, E, and K. These vitamins work synergistically to support immune function and maintain skin health. Including asparagus in your meals not only adds a lovely crunch but ensures you are consuming a variety of beneficial nutrients.
Furthermore, asparagus can easily be grilled, roasted, or steamed alongside your salmon, making it a versatile vegetable to work with. Consider seasoning it simply with olive oil, salt, and pepper to highlight its natural flavors.
3. Cooking Techniques for a Healthier Dish
To prepare a low-calorie yet delicious Salmon with Asparagus dish, consider grilling or baking your salmon rather than frying it. This method reduces additional fat and calories, while still allowing the fish to retain its moisture and flavors. A standard baking method involves wrapping the salmon in foil with asparagus and seasoning before placing it in a preheated oven at 400°F for about 15 to 20 minutes.
Another great cooking technique is broiling, which allows for a crispy exterior while keeping the interior tender. Simply position the salmon and asparagus on a baking sheet and place it under the broiler for approximately 10 minutes, keeping a close eye to avoid burning. This quick cooking method not only saves time but also locks in healthy nutrients and flavors.
Lastly, consider using fresh herbs and citrus such as lemon or dill to enhance the flavor profile without adding extra calories. These ingredients pair well with both salmon and asparagus, creating a well-rounded dish that is both satisfying and nutritious.
5. Stuffed Bell Peppers
Choosing the Right Bell Peppers
When preparing Stuffed bell peppers, selecting the right type of peppers is crucial for the overall dish. Bell peppers come in various colors including green, red, yellow, and orange. Each color has a unique taste profile; for instance, red peppers tend to be sweeter while green peppers offer a more herbaceous flavor. For a dish that balances taste and nutritional value, consider a mix of colors.
Nutritionally, bell peppers are low in calories and high in vitamins. A medium-sized bell pepper typically provides around 24 calories and is packed with Vitamin C, which supports the immune system. This nutrient density makes them an excellent choice for those looking to maintain a healthy diet.
Preparation and Cooking Techniques
Proper preparation of bell peppers is essential to ensure they cook evenly. Start by slicing the tops off and removing the seeds and membranes. This not only makes for an attractive presentation but also provides ample room for stuffing. As an added tip, lightly blanching the peppers in boiling water for a few minutes can soften them, allowing for quicker cooking and better flavor absorption later on.
Cooking techniques vary widely; however, baking and steaming are two popular methods. Baking usually involves preheating your oven to around 375°F (190°C) and allowing the peppers to roast for approximately 25-30 minutes. This method enhances the flavors and creates a satisfying texture.
Stuffing Options: A Variety of Flavors
The beauty of stuffed bell peppers lies in their versatility regarding the filling. Common options include quinoa, brown rice, turkey, and various beans. These ingredients not only add flavor but also boost the dish's protein and fiber content. Mixing different spices, such as cumin or paprika, can elevate the overall taste and make it more appealing.
Consider dietary preferences as well. For a vegetarian option, incorporating lentils and vegetables can provide a hearty filling that satisfies both texture and taste. Experimenting with different combinations can turn a simple dish into a culinary delight.
Nutritional Benefits of Stuffed Bell Peppers
Stuffed bell peppers can be a wholesome addition to your evening meal. They are low-calorie yet high in essential nutrients. For instance, bell peppers are rich in antioxidants, particularly carotenoids, which can contribute to reducing inflammation and improving eye health. Including lean protein and whole grains in the stuffing helps balance macronutrients, making the dish satisfying.
Serving Suggestions
When it comes to presenting stuffed bell peppers, simplicity usually works best. A garnish of fresh herbs like parsley or cilantro can add a pop of color and freshness to the dish. Additionally, serving them alongside a light salad with a vinaigrette dressing can enhance the meal by providing a refreshing contrast.
Meal Prep and Storage Tips
Stuffed bell peppers are excellent candidates for meal preparation. You can prepare them in advance, store them in airtight containers, and refrigerate for up to three days. When reheating, adding a splash of water before microwaving can revive their moisture, preventing them from drying out.
If you wish to freeze them, it's best to do so before cooking. Arrange the stuffed peppers in a single layer on a baking sheet until frozen and then transfer them to a freezer-safe bag. They can last up to three months in the freezer.
Variations to Try
Feel free to put your own spin on traditional stuffed bell peppers. For instance, try incorporating different grains like cauliflower rice or buckwheat for a gluten-free option. You could also go international by infusing flavors such as taco seasoning for a Mexican twist or using curry powder for an Indian-inspired dish. Each variation can introduce a new taste profile while keeping the essence of stuffed peppers intact.
6. Cauliflower Fried Rice
Understanding Cauliflower as a Rice Alternative
Cauliflower has gained popularity as a low-calorie substitute for rice, particularly among those seeking healthier meal options. One cup of cooked cauliflower rice contains only about 25 calories compared to approximately 200 calories in the same serving of white rice. This stark difference allows those on calorie-restricted diets to enjoy a satisfying and filling meal without exceeding their daily caloric intake.
Additionally, cauliflower is rich in essential vitamins and minerals, including Vitamin C and Vitamin K. These nutrients support immune function and bone health while providing antioxidant properties that can reduce oxidative stress in the body. Incorporating cauliflower into your diet can therefore offer both a low-calorie option as well as nutritional benefits.
Key Ingredients for a Flavorful Fried Rice
To elevate the taste of cauliflower fried rice, consider adding protein sources like shrimp, chicken, or tofu. These ingredients not only contribute to the overall flavor but also enhance the dish's nutritional profile by providing necessary amino acids. For instance, a serving of shrimp adds about 24 grams of protein while remaining low in calories.
Cooking Techniques for Perfect Fried Rice
When preparing cauliflower fried rice, the technique used can make a significant difference in texture and taste. Sautéing the cauliflower in a hot pan helps achieve that desirable crispy texture while preventing the mixture from becoming mushy. Aim for medium-high heat to allow the cauliflower to cook quickly, locking in flavors without losing its nutritional value.
Moreover, adding soy sauce or tamari can introduce extra umami flavor, which enhances the overall meal experience. Just be mindful of the sodium content, especially if you are monitoring salt intake. You can control this by using low-sodium soy sauce or even experimenting with coconut aminos as a flavorful alternative.
Serving Suggestions and Pairings
Cauliflower fried rice makes a versatile base that can be paired with various side dishes or toppings. Consider serving it alongside a fresh salad to add more volume and nutrients without significantly increasing calorie counts. Additionally, topping the dish with a fried egg can enhance flavors and add richness, making for a more satisfying meal.
You can also garnish the fried rice with fresh herbs like cilantro or green onions. These add brightness to the dish, making it visually appealing while also enhancing the flavor profile. When all these elements come together, cauliflower fried rice can truly shine as a delicious and wholesome option for dinner.
7. Zucchini Noodles with Pesto
What Are Zucchini Noodles?
Zucchini Noodles, often referred to as zoodles, are a popular low-carb alternative to traditional pasta. Made by spiralizing fresh zucchini, these noodles provide a similar texture to regular pasta while maintaining significantly fewer calories and carbohydrates. A medium-sized zucchini contains about 33 calories, compared to a traditional serving of pasta, which typically has around 200 calories. This makes zoodles a fantastic choice for anyone looking to reduce their caloric intake without sacrificing a beloved comfort food.
The process of making zoodles is quite simple and can be done with a spiralizer—an easy kitchen gadget that transforms vegetables into noodle-like shapes. Not only does this technique produce a visually appealing dish, but it also encourages healthy eating habits by incorporating more vegetables into one's diet. For those interested in health trends, zoodles have become a staple in many meal prep plans and healthy cooking blogs.
Health Benefits of Zucchini
Incorporating zucchini into your meals comes with a plethora of health advantages. Zucchini is hydrating and rich in essential vitamins and minerals, such as vitamin C, vitamin A, and potassium. Its high water content, which makes up about 95% of the vegetable, helps maintain hydration and aids digestion. Additionally, zucchini contains antioxidants that combat oxidative stress and inflammation in the body, contributing to long-term health.
Moreover, zucchini is low in calories, which can assist in weight management. Its fiber content aids in digestion, keeps you feeling full longer, and regulates blood sugar levels. Research has shown that increasing vegetable intake can improve overall health and decrease the risk of chronic diseases, making it a wise addition to any dinner recipe.
The Perfect Pesto Sauce
Pesto is a classic Italian sauce made from fresh basil, garlic, pine nuts, olive oil, and Parmesan cheese. It's the perfect complement to zucchini noodles because of its rich flavor and creamy texture. The beauty of pesto is in its versatility; you can customize it by adding ingredients like spinach, kale, or walnuts to enhance nutritional value. Homemade pesto allows you to control the ingredients and reduce unnecessary preservatives found in store-bought versions.
The ratio of basil to oil in pesto varies by personal preference, but a good starting point is usually 2 cups of basil, 2-3 cloves of garlic, and about half a cup of olive oil. For an even healthier twist, consider replacing half of the oil with water to lighten the sauce without sacrificing flavor. This method allows for a more calorie-conscious meal while still enjoying the classic taste of pesto.
One serving of traditional pesto can contain around 300 calories, depending on the amount of oil used. By making modifications to the recipe, you can significantly reduce the calorie count without compromising on taste. Experimenting with different nuts can also provide variations in flavor and texture, so don’t hesitate to try your favorites.
Recipe for Zucchini Noodles with Pesto
Creating zucchini noodles with pesto at home is straightforward. Begin by spiralizing 2 medium zucchinis into noodle shapes. You can use a standard spiralizer or a handheld tool, which is often more cost-effective. Once you have your zoodles ready, you can sauté them in a non-stick pan for about 3-5 minutes. This process helps to soften them slightly while maintaining their crunchiness.
While the zucchinis are cooking, combine your ingredients for the pesto in a food processor. Blend until smooth, and then season with salt and pepper to taste. After cooking the zoodles, toss them in the pesto until evenly coated. A sprinkle of freshly grated Parmesan cheese and some toasted pine nuts on top can elevate the dish even further. This easy recipe serves two, but it can easily be scaled up for more servings.
Pairing Suggestions
When serving zucchini noodles with pesto, consider pairing them with a protein source to create a well-balanced meal. Grilled chicken, shrimp, or tofu makes an excellent addition, providing protein that can keep you satiated for longer. The flavors of grilled meats blend beautifully with the fresh taste of basil, making the entire dish more satisfying.
For a vegetarian option, consider adding chickpeas or white beans. They are not only nutritious, but their creamy texture complements the dish's overall consistency. If you're a fan of heat, sprinkle some red pepper flakes for an added kick. This combination adds depth and variety to your meal, ensuring that even the pickiest eaters will enjoy this healthful dish.
Nutritional Information
Understanding the nutritional profile of your meal is vital, especially when focusing on healthier dinners. A serving of zucchini noodles with a homemade pesto sauce contains around 150-200 calories, depending on the amount of pesto used. For those monitoring their macronutrients, the dish typically has 3-5 grams of protein, 8-10 grams of fat, and 10-15 grams of carbohydrates.
Generally, this dish is also low in sodium, particularly if you control the amount of cheese and salt you add. The fiber content from the zucchini contributes valuable nutrients that support digestive health. When you prepare this dish at home, you have the power to adapt it to meet your specific dietary needs while still enjoying a satisfying meal.
Creative Variations
One of the best features of zucchini noodles is their adaptability. For instance, instead of traditional pesto, you can try a sun-dried tomato or beet pesto for a unique twist. Adding roasted cherry tomatoes or spinach not only enhances the flavor but also boosts the dish's nutritional value. You can even introduce different proteins, like smoked salmon or diced turkey, to vary the flavor profile.
Another exciting variation includes a spicy peanut sauce, which pairs well with zoodles for an Asian-inspired dinner. Mix in sliced bell peppers, carrots, or cucumber for added crunch and nutrition. The endless possibilities ensure that you won't get bored with this dish, keeping your meals both interesting and healthy.
8. Turkey Taco Lettuce Wraps
Ingredients for Turkey Taco Lettuce Wraps
To create a delicious batch of Turkey Taco Lettuce Wraps, you'll need a few essential ingredients. Start with lean ground turkey, which is not only low in calories but also high in protein. A typical 3-ounce serving of ground turkey contains approximately 22 grams of protein, making it an ideal choice for a filling meal.
Next, gather Fresh Vegetables such as bell peppers, onions, and tomatoes to add crunch and flavor. Don't forget the seasoning; chili powder, cumin, and garlic powder are key to achieving that authentic taco taste. Additionally, using large lettuce leaves like Romaine or Butter Lettuce as the wrap adds a refreshing taste while minimizing carbs.
Lastly, consider toppings like salsa, avocado, or low-fat cheese for added flavor without significantly increasing the calorie count. Choosing these ingredients allows you to enjoy a tasty dish while keeping your meal low in calories and high in nutrients.
Preparation Steps for Cooking
Begin the cooking process by heating a non-stick skillet over medium heat. Add the ground turkey and cook until it’s browned, which usually takes about 5-7 minutes. Make sure to break it up with a spatula to ensure even cooking and to prevent any large clumps from forming. The turkey should reach an internal temperature of 165°F to ensure safety.
Once browned, stir in your chopped vegetables and spices. This will allow the flavors to meld beautifully, creating a cohesive mix of tastes. Sauté the mixture for an additional 3-5 minutes, allowing the vegetables to soften slightly while retaining some crunch. The addition of a splash of chicken broth can help deglaze the pan and enhance the flavor profile.
Serving Suggestions and Variations
When it comes to serving Turkey Taco Lettuce Wraps, presentation can make all the difference. Arrange the lettuce leaves on a platter and spoon the turkey mixture into each one. Offer a variety of toppings on the side so guests can customize their wraps with items like diced tomatoes, sliced jalapeños, or cilantro. This variety not only enhances the flavor but also encourages interaction during mealtime.
For added versatility, consider swapping out ground turkey for ground chicken, tofu, or even quinoa if you are looking for vegetarian options. Leafy greens like Swiss chard or collard greens can also be used in place of traditional lettuce for a unique twist.
Finally, if you’re meal prepping, the turkey mixture can be stored in an airtight container for up to three days in the refrigerator. This makes Turkey Taco Lettuce Wraps an excellent choice for meal planning, as you can whip up healthy dinners with minimal effort throughout the week.
9. Shrimp Stir-Fry
Ingredients for a Healthy Shrimp Stir-Fry
To create a delicious shrimp stir-fry, it's essential to gather the right ingredients. Fresh shrimp, preferably wild-caught, is highly recommended for superior taste and nutritional value. They are low in calories yet high in protein, making them an excellent choice for a Healthy Meal.
In addition to shrimp, a variety of vibrant vegetables can enhance the dish. Bell peppers, broccoli, and snap peas not only add color but also provide essential vitamins. Consider using a combination of fresh ginger and garlic to infuse your stir-fry with a robust flavor profile, while also benefiting from their anti-inflammatory properties.
Cooking Techniques for Optimal Flavor
When it comes to stir-frying, technique is key. Begin by ensuring your wok or skillet is pre-heated to a high temperature; this is essential for achieving that desired sear on the shrimp. A quick cooking time preserves the texture and moisture of the shrimp, preventing them from becoming rubbery.
Moreover, using minimal oil, such as sesame or avocado oil, can reduce calorie content while still providing that essential flavor. Stir-frying methods promote even cooking and allow the natural tastes of the ingredients to shine. Consistently tossing the contents of the pan ensures even heat distribution, so no ingredient is left undercooked or overdone.
Flavor Boosters and Seasoning Options
Adding a splash of soy sauce or tamari can elevate your shrimp stir-fry, providing a rich umami note that complements the sweetness of the shrimp and the crunch of the vegetables. Opting for low-sodium options can help keep the dish healthy while enhancing its savory flavor.
Consider incorporating a drizzle of lime juice just before serving; this adds a refreshing tang that balances the dish. Fresh herbs, like cilantro or green onions, can be sprinkled on top right before serving for an added textural contrast and a burst of flavor.
You may want to experiment with different spice blends or sauces for variety, such as sweet chili or a homemade peanut sauce, to create unique variations of your shrimp stir-fry, catering to your personal taste preferences.
Serving Suggestions and Pairings
To round out your meal, consider serving your shrimp stir-fry over a bed of cauliflower rice or quinoa. Both options are great low-calorie alternatives to traditional rice and can add an extra layer of nutrition to your dish. This not only makes your meal heartier but also ensures you are meeting your dietary fiber needs.
An accompanying side salad with a light vinaigrette can complement the stir-fry nicely, providing a refreshing contrast. You might opt for a simple mix of arugula, avocados, and cherry tomatoes for a flavorful profile that harmonizes with the shrimp.
Finally, don’t underestimate the power of presentation. Serving the stir-fry in a brightly colored bowl can make the meal feel more appealing and indulgent, enhancing your dining experience without adding extra calories.
10. Greek Yogurt Chicken Salad
Ingredients You'll Need
To make a delicious Greek yogurt chicken salad, start by gathering fresh ingredients. You'll need cooked, shredded chicken breast—about two cups is ideal. Opt for lean chicken to keep calories low without sacrificing protein content.
Then, include a cup of plain Greek yogurt, which serves as a healthier substitute for mayonnaise, providing creaminess with high protein and lower fat. Don’t forget to add diced celery, chopped red onion, and fresh dill. These elements contribute crunch and flavor, turning your salad into a satisfying dish.
Health Benefits of Greek Yogurt
Greek yogurt is packed with probiotics and contributes to gut health, which aids digestion and boosts the immune system. Additionally, it's an excellent source of protein; one cup can provide around 20 grams, making it an ideal choice for a protein-rich meal that keeps you full and energized.
This yogurt variant also contains less sugar compared to traditional yogurt, making it a better option for anyone aiming to reduce their sugar intake. If you're looking for options, brands such as Fage or Chobani offer great tasting choices that you can easily find at your local grocery store.
Preparation Instructions
Start by preparing your chicken: if it’s not already cooked, poach or grill it until fully cooked, then let it cool before shredding. Next, in a large mixing bowl, combine the shredded chicken with Greek yogurt, ensuring an even coating. Stir in diced celery and red onion until everything is well-mixed.
For an extra boost of flavor, season with salt, pepper, lemon juice, and fresh dill. Toss the salad again to make sure the flavors meld nicely. Refrigerate the mixture for at least 30 minutes before serving to let the flavors develop further.
Serving Suggestions
Greek yogurt chicken salad can be served in multiple ways, allowing for versatility in your meal planning. For a light option, consider placing the salad on a bed of mixed greens or romaine lettuce. This not only adds nutrients but also maintains a low-calorie count.
Alternatively, you can use whole-grain wraps or pita pockets for a more filling meal. Adding some sliced avocado can enhance the dish with healthy fats while also elevating the flavor profile. Ensure to enjoy it fresh, as the vibrant flavors are most prominent right after preparation.
Storage Tips
Proper storage is essential to maintain the freshness of your Greek yogurt chicken salad. You can keep the salad in an airtight container in the refrigerator for up to three days. This makes it a perfect option for meal prep; you can prepare it in advance and have healthy lunches ready to go.
However, avoid freezing it, as the texture of Greek yogurt can change when thawed, making the salad less appealing. Always check for freshness before consuming, especially if you notice any change in scent or texture.
Why Choose Low-Calorie Options
Opting for Low-calorie meals like Greek yogurt chicken salad has multiple benefits, particularly if you aim to maintain a healthy lifestyle. Research shows that meals lower in calories can directly contribute to weight management, especially when combined with regular physical activity.
Moreover, low-calorie meals can still be satisfying and flavorful, ensuring that you don’t feel deprived while on a diet. Foods rich in protein, like Greek yogurt and chicken, can help regulate hunger hormones, which is beneficial when aiming for weight loss or maintenance.
11. Eggplant Parmesan
Ingredients for a Delicious Eggplant Parmesan
To make a traditional Eggplant Parmesan, you'll need several key ingredients that provide both flavor and texture. Fresh eggplants are essential, typically about two medium-sized ones, which should be sliced into about half-inch rounds. This thickness strikes a balance between tenderness and structural integrity when baked. Additionally, you will require marinara sauce, preferably homemade or a low-sodium store-bought version, which adds rich flavor without unnecessary preservatives.
Cheese plays a critical role as well, so prepare a combination of fresh mozzarella for melting and grated Parmesan for a sharp, salty finish. Herbs like basil and oregano enhance the dish’s aroma and taste, providing a fresh note that complements the richness of the cheese. Don’t forget olive oil, which is necessary for sautéing the eggplant and adding depth to the overall flavor profile.
Health Benefits of Eggplant
Eggplant, primarily composed of water, is a low-calorie vegetable, making it an excellent choice for anyone looking to maintain or lose weight. A one-cup serving has about 20 calories, providing a hearty yet light option for dinner. It is also rich in dietary fiber, which promotes digestive health and can help you feel fuller for longer, potentially reducing the overall calorie intake during meals.
Moreover, eggplants contain antioxidants, such as nasunin, which has been shown to support brain health and may even protect against free radical damage. Including this vibrant vegetable in your diet can contribute to your overall well-being by reducing chronic disease risks. Integrating eggplants into delicious recipes like Eggplant Parmesan makes it easier to enjoy their numerous Health Benefits.
Preparation Steps for Eggplant Parmesan
To get started on your Eggplant Parmesan, first preheat your oven to 375°F (190°C). Slice the eggplants and let them sit for about 30 minutes with a sprinkle of salt, which draws out excess moisture and bitterness. Afterward, rinse and pat them dry. This step is crucial as it ensures that the eggplant will be tender and flavorful without becoming soggy during cooking.
Next, you should lightly coat the eggplant slices with olive oil and roast them in the oven until golden brown, which typically takes about 25-30 minutes. This roasting method helps develop a complex flavor and ensures the eggplant slices maintain a good texture during the layering process that follows. Once roasted, you can begin assembling your layers with marinara sauce, eggplant, and cheese in a baking dish.
Serving Suggestions and Pairing
Eggplant Parmesan can be served in a variety of ways. For a satisfying meal, accompany it with a side salad featuring dark leafy greens, which add nutrients and a crunch that contrasts beautifully with the rich, cheesy dish. A light vinaigrette dressing can enhance the freshness of your salad, providing a balanced palate experience. Also, crusty whole-grain bread or garlic bread makes a great companion to soak up the delicious sauce.
Wine pairing can also elevate this dish. A medium-bodied red wine, such as Chianti, complements the acidity of the marinara sauce and supports the robust flavors of the eggplant and cheese. On the other hand, a refreshing non-alcoholic option like sparkling water with a twist of lemon can cleanse your palate between bites.
Storing and Reheating Leftovers
Storing leftover Eggplant Parmesan is straightforward—simply cover it tightly with plastic wrap or transfer it to an airtight container. When refrigerated, it can last for about three to four days, maintaining its flavor and texture. For those who enjoy meal prepping, this dish is an excellent make-ahead option that allows flavors to meld over time.
When reheating, it’s best to do so in the oven rather than using a microwave, as the microwave can make the eggplant soggy. Preheat the oven to 350°F (175°C) and reheat until the cheese is bubbly and the dish is heated through. This method preserves the crispy texture of the top layer, ensuring a satisfying eating experience.
Variations and Customizations
While the classic Eggplant Parmesan is delicious, don’t hesitate to put your personal spin on it. Consider adding layers of sautéed spinach or mushrooms for added nutrients and flavor. Some recipes even incorporate a layer of pesto for a herby kick, transforming the traditional dish into a unique culinary experience. Alternatively, if you’re looking to reduce calories further, try using less cheese or opting for a lower-fat mozzarella.
For those on gluten-free diets, substituting traditional bread crumbs with ground almonds or gluten-free breadcrumbs would work well, providing the necessary crunch without compromising dietary restrictions. You can also add a sprinkle of nutritional yeast for a cheesy flavor that’s vegan-friendly. Experimenting with these variations can make Eggplant Parmesan a versatile dish suited to various dietary needs.
12. Coconut Curry Lentil Soup
Ingredients Overview
To create a delicious Coconut Curry Lentil Soup, you'll need a variety of ingredients that not only enhance flavor but also boost nutritional value. Basic items include red lentils, coconut milk, and an array of spices such as turmeric, cumin, and coriander. Don't forget fresh produce like onions, garlic, and ginger, which add depth to the soup.
Incorporating vegetables like carrots, spinach, or bell peppers can also introduce vibrant colors and additional textures to your dish. If you're looking for an easy method to increase protein content, consider adding chickpeas or additional legumes, which pair wonderfully with the soup's base.
Cooking Instructions
Begin by heating a little oil in a large pot before adding diced onions, minced garlic, and grated ginger. Sauté them for about five minutes until they soften and release their fragrance. Next, mix in your spices, allowing them to toast and intensify their flavors for an additional minute. This step is crucial for giving your soup a robust and aromatic base.
Once the spices are fragrant, stir in the lentils, followed by vegetable broth and coconut milk. Allow everything to come to a gentle boil before reducing the heat and letting it simmer for about 25 to 30 minutes until the lentils are tender and the soup has thickened nicely.
Nutritional Benefits
This Coconut Curry Lentil Soup not only tantalizes taste buds but also offers substantial health benefits. Lentils are a powerhouse of protein and dietary fiber, which can aid digestion and improve satiety levels. Additionally, coconut milk provides healthy fats that can help in managing cholesterol levels when consumed in moderation.
The assortment of spices used, particularly turmeric, has been linked to anti-inflammatory properties, which can be beneficial for individuals looking to incorporate more health-conscious meals into their diet. It's a balanced option that doesn't compromise on nutrition.
Serving Suggestions
To elevate your Coconut Curry Lentil Soup, consider pairing it with warm naan or brown rice for a complete meal. Garnishing with fresh cilantro or a squeeze of lime can add a burst of freshness that complements the rich, creamy texture of the soup. For a bit of spice, a drizzle of sriracha or a sprinkle of red pepper flakes can work wonders.
For those who enjoy meal prepping, this soup is perfect for storage. It tastes even better the next day as the flavors meld, making it an ideal candidate for next-day lunches or easy dinners throughout the week. Just store in airtight containers to preserve freshness.
Recipe Variations
There are numerous ways to customize your Coconut Curry Lentil Soup. For a spicier kick, you can add diced jalapeños or a spoonful of curry paste. If you prefer a thinner consistency, simply add more vegetable broth or coconut milk until your desired texture is achieved. Each variation brings its own twist to the original recipe.
Vegetarians can substitute vegetable broth for chicken broth, while vegans will find this soup naturally fits into their diet without any modifications. Additionally, exploring different types of lentils, such as green or brown, can result in a unique texture and flavor profile from the traditional red lentils.
Storage Tips
Storing leftover Coconut Curry Lentil Soup is simple. Allow it to cool completely before transferring it to airtight containers for refrigeration. Properly stored, it can last up to five days in the refrigerator without losing its flavor. For longer storage, consider freezing portions, which can be easily thawed and reheated later.
When reheating, it’s advisable to add a splash of water or additional coconut milk. This helps restore the soup’s creamy texture and prevents it from becoming too thick. Just heat over low-medium heat, stirring occasionally for best results.
Cooking for a Crowd
If you're preparing this Coconut Curry Lentil Soup for a larger gathering, simply double or triple the recipe as needed. This dish is inherently versatile and can be easily scaled up without much extra effort. Don’t forget to adjust the seasoning accordingly to maintain balanced flavors.
Additionally, consider setting up a soup bar with various toppings like croutons, chopped green onions, or additional spices. This interactive approach not only makes serving easier but also allows guests to customize their bowls according to personal preferences, enhancing their dining experience.
13. Baked Lemon Garlic Tilapia
Ingredients for Baked Lemon Garlic Tilapia
To prepare a delicious baked lemon garlic tilapia, you'll need fresh tilapia fillets as the star of the dish. Ideally, select fillets that are firm and have a mild aroma. Purchasing fish from a reputable source ensures both quality and freshness, which are crucial for an enjoyable meal.
In addition to the tilapia, gather a few staple ingredients: fresh lemons, minced garlic, olive oil, and fresh herbs such as parsley or dill. The combination of these ingredients not only enhances the flavor profile but also contributes to the dish's low-calorie count. Using fresh herbs provides a boost of antioxidants without adding unnecessary calories.
Finally, seasonings like salt and pepper play a vital role in bringing the dish together. Feel free to add a pinch of paprika or lemon zest for an extra kick. This recipe is versatile; consider adding vegetables like asparagus or cherry tomatoes to the baking tray for a single-pan meal.
Preparation Steps
Start by preheating your oven to 400°F (200°C), setting the stage for thorough cooking that keeps the tilapia moist. While the oven warms, line a baking dish with parchment paper to prevent sticking and make cleanup easier. This technique is particularly handy when dealing with lean fish, as they can easily fall apart during cooking.
Next, prepare a marinade by whisking together olive oil, minced garlic, lemon juice, and your choice of herbs. Emulsifying these ingredients allows for a flavorful coating that will penetrate the fish. Marinating the tilapia for at least 15 minutes enhances the flavor, allowing the garlic and lemon to infuse into the fish.
Baking the Tilapia
Once prepared, place the seasoned tilapia fillets in the lined baking dish and pour the marinade over them. It’s essential to ensure that the fillets are evenly coated to guarantee flavor in every bite. Baking tilapia at the right temperature (400°F) helps lock in moisture, resulting in tender, flaky fish.
Cook the tilapia for approximately 15 to 20 minutes, depending on the thickness of the fillets. It’s crucial to monitor the fish closely, as overcooking can lead to a dry texture. A perfectly baked tilapia should flake easily with a fork and have an internal temperature of 145°F (63°C). This simple approach ensures that your meal remains both healthy and appealing.
If you're looking for a bit of browning on the top, consider briefly broiling the fish in the last few minutes of cooking. This will give the dish an appealing color while maximizing the flavor of your marinade.
Serving Suggestions
Baked lemon garlic tilapia pairs beautifully with a side of steamed vegetables or a fresh salad. For a complete and balanced meal, consider incorporating whole grains like quinoa or brown rice, which complement the dish’s lightness while adding essential nutrients.
Another idea is to serve the fish on a bed of sautéed spinach or alongside zucchini noodles for a low-carb option. Drizzling a bit of extra lemon juice over the top just before serving enhances the dish’s freshness, making it vibrant and appealing to the eye.
Health Benefits of Tilapia
This recipe not only delivers great taste but also offers substantial health benefits. Tilapia is an excellent source of lean protein, which is essential for muscle repair and growth. A 3-ounce serving typically contains around 22 grams of protein and is low in calories, with approximately 110 calories, making it an excellent choice for weight management.
Moreover, tilapia is rich in omega-3 fatty acids and vitamin B12, which are crucial for brain health and red blood cell formation, respectively. Research suggests that including fish in your diet at least twice a week can significantly reduce the risk of heart disease and promote overall well-being. Incorporating tilapia into your dinner routine supports both health and taste.
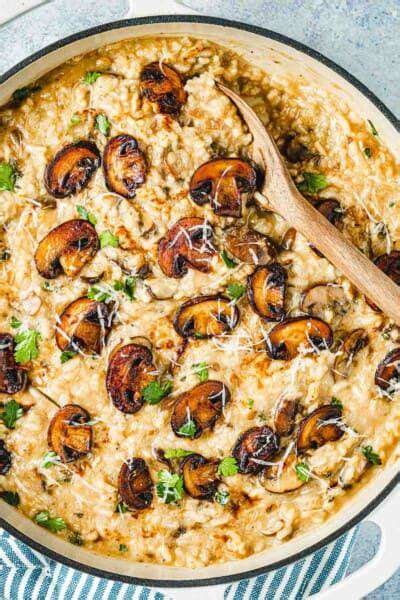
14. Mushroom Risotto
Ingredients for Mushroom Risotto
To make a delicious mushroom risotto, you'll need a few essential ingredients that create a rich flavor profile. Start with Arborio rice, known for its high starch content, which helps give the dish its creamy texture. You'll also need fresh mushrooms, such as cremini or shiitake, to enhance the dish's earthy flavor.
Other critical components include high-quality vegetable or chicken broth, onion, garlic, and parmesan cheese. Using homemade broth can elevate the dish significantly, adding depth and a personal touch. Additionally, don’t forget seasonings like thyme, salt, and pepper to round off the flavor.
- Arborio rice for creaminess
- Fresh mushrooms for earthy notes
- High-quality broth for depth
- Onion and garlic for aromatics
- Parmesan cheese for richness
Cooking Technique for Risotto
The key to a successful mushroom risotto lies in the cooking technique, specifically the method of slowly incorporating broth. Start by sautéing onions and garlic in olive oil until they are fragrant and translucent, then add the Arborio rice. By toasting the rice slightly, you enhance its flavor before adding any broth.
Next, begin ladling in warm broth, one cup at a time, allowing the rice to absorb the liquid before adding more. This technique not only infuses flavor but also ensures that the rice cooks evenly. Stirring frequently is essential, as it releases starch and contributes to the iconic creaminess of risotto.
After about 20 minutes, when the rice is al dente, it'll be time to incorporate the cooked mushrooms and finish with parmesan cheese and butter. This final step adds a luxurious touch to the dish, making it a comforting meal without added calories. Remember, patience is key when making risotto, as it can make all the difference in achieving the perfect consistency.
Nutritional Benefits of Mushroom Risotto
Mushroom risotto can be a surprisingly healthy meal if prepared with the right ingredients. For instance, mushrooms are low in calories, yet packed with nutrients such as B vitamins and selenium, contributing to overall well-being. Incorporating vegetables can increase fiber content while also providing essential vitamins.
Using a vegetable broth instead of chicken broth can reduce calories while keeping the dish flavorful. Moreover, reducing the amount of Parmesan and butter used can create a lighter dish without sacrificing taste. According to the USDA, a serving of risotto (approximately 1 cup) can contain less than 300 calories if made with mindful choices.
Ultimately, this dish is versatile, and swapping for whole grain or brown rice can add nutrients while enhancing the fiber content. It provides a satisfying meal option that aligns with a balanced diet, making it a perfect choice for those seeking a low-calorie but delicious dinner.
15. Cauliflower Tacos
Ingredients Needed for Cauliflower Tacos
To create flavorful cauliflower tacos, you'll need a solid foundation of ingredients that can elevate the dish. Start with one large head of cauliflower, which will serve as the main filling. You’ll also require spices such as cumin and paprika, which add depth and warmth to the dish. Don’t forget to include fresh lime juice, which offers a tangy counterpoint to the cauliflower's earthiness.
In addition to the basic ingredients, consider including toppings like diced tomatoes, shredded lettuce, and avocado for added texture and flavor. These toppings not only enhance the appearance but also increase the nutritional value of your meal. A drizzle of salsa or a dollop of Greek yogurt could further enrich the flavor profile of your tacos.
Health Benefits of Cauliflower
Cauliflower is renowned for its numerous health benefits. As a cruciferous vegetable, it is rich in vitamins C, K, and several B vitamins, contributing to greater immunity and overall health. The high fiber content supports digestive health, while its low-calorie count makes it a suitable alternative for weight management, allowing you to enjoy generous portions without compromising your diet.
Recent studies have shown that the antioxidants found in cauliflower may help in reducing inflammation, potentially lowering the risk of chronic diseases such as heart disease and cancer. Incorporating such nutrient-dense vegetables in meals enhances not just health, but also adds variety to your diet.
Moreover, its versatility means it can easily take on different flavors from spices and sauces, making it an ideal canvas for various culinary creations. Whether grilled, roasted, or sautéed, it maintains its integrity while absorbing flavors quite well.
Step-by-Step Preparation Guide
Start by preheating your oven to 425°F (220°C) and preparing a baking sheet lined with parchment paper. Remove the leaves and stem from the cauliflower, then chop it into bite-sized florets. Toss these florets with a blend of olive oil, cumin, paprika, and a sprinkle of salt to enhance their flavor.
Spread the seasoned cauliflower evenly on the baking sheet, ensuring they are not overcrowded, which promotes even roasting. Bake for about 25-30 minutes, or until the edges are slightly charred and the florets are tender, stirring halfway through to ensure all sides get that delectable roast.
While the cauliflower roasts, prepare your toppings in advance. Chopping your fresh veggies and mixing your salsa or yogurt-based sauce will make assembly quick and easy once the cauliflower is ready.
Variations to Try
While the classic cauliflower taco is delicious as is, you might want to experiment with various ingredients to keep things exciting. For a spicy kick, consider adding minced jalapeños or chili powder to the seasoning mix. Alternatively, to satisfy a Mediterranean craving, you could replace traditional toppings with feta cheese and olives.
For those who enjoy fusion foods, try adding a Korean twist by using gochujang sauce as a topping. A sprinkle of sesame seeds and chopped green onions can enhance the dish's authenticity and flavor profile, showcasing the versatility of cauliflower tacos.
Serving Suggestions
When it comes to serving cauliflower tacos, presentation is key. Consider serving them on a wooden board or a large platter for a rustic feel. You can layer the tacos and allow guests to build their own, adding a personal touch to each taco. This interactive element can make your meal more engaging and enjoyable.
Pair these tacos with a refreshing side salad or baked sweet potato fries to create a balanced meal. Moreover, a light beer or sparkling water can complement the meal perfectly, providing a refreshing contrast to the earthy flavors of the tacos.
Tips for Meal Prepping
Meal prepping is a smart way to save time and ensure healthy choices throughout the week. Cook the cauliflower in advance and store it in an airtight container in the refrigerator. This way, you can easily assemble tacos in a matter of minutes on busy weeknights.
You can also batch-cook your toppings, chopping vegetables and preparing sauces ahead of time. Keep these in separate containers to maintain freshness until you're ready to enjoy your tacos. This strategy not only streamlines dinner preparation but also minimizes food waste, as you’ll be using ingredients crafted for your meals efficiently.
Final Thoughts on Cauliflower Tacos
Cauliflower tacos are a delicious and nutritious alternative to traditional meat-based tacos. They offer a wealth of flavor while keeping calorie counts low, making them a perfect option for health-conscious individuals. Whether you’re a seasoned cook or a kitchen novice, these tacos are both easy to make and highly customizable, ensuring everyone can enjoy them.
So go ahead, give these cauliflower tacos a try! They might just become a weekly staple in your meal rotation. Remember, exploring different toppings and flavors is part of the joy of cooking, so don’t hesitate to let your creativity shine through your personal touches.
Read more about 15 Low Calorie Dinner Recipes That Actually Taste Good
![What is the Mediterranean DASH Diet? [Benefits & How To]](/static/images/26/2025-05/MakingtheMediterranean-DASHDietaSustainableLifestyle.jpg)